Originally written for: Konica Minolta DI1810
Also applies to: Konica Minolta DI1810F, DI2010, DI2010F, DI2510, DI2510F, DI3010, DI3010F, DI3510, DI3510F
These instructions describe how to rebuild the imaging unit for a Konica Minolta DI1810 and similar models.
|

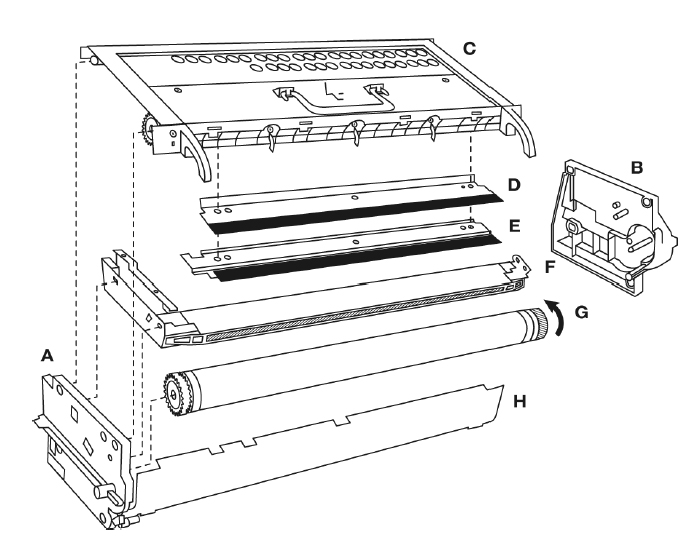
(A) Left PU Frame
(B) Right PU Frame
(C) Cleaning Unit
(D) Drum Cleaning Blade
(E) Dust Shield
(F) Charge Corona
(G) OPC Drum
(H) Drum Shutter
Rebuild Kit Contents:
- OPC drum
- Drum cleaning blade
Pre-Disassembly
- Prior to removing used Imaging Unit (IU), Select Tech. Rep. Mode - Counter - PM - PC Life.
- Press the Clear key to clear the counter value.
- Turn copier power off and remove Imaging Unit.
- Detach OPC Drum Unit from Developing Unit by removing (4) silver screws.
Disassembly
Note: Follow these instructions carefully. The quality and performance of the rebuilt Minolta Imaging Unit (IU) will depend on your workmanship, as well as the condition of the used Imaging Unit being rebuilt. Be sure to read and understand each rebuild step prior to beginning each step.
- Position OPC Drum Unit so the OPC Drum Shutter (H) is facing away from you and OPC Drum Unit is resting on Cleaning Unit (C).
- Remove the 2 Phillips screws from the Right OPC Drum Unit Frame (B)
- Remove the Right OPC Drum Unit Frame (B).
- Remove used OPC Drum.
- Remove Chare Corona (F) by pulling to the right.
- Remove the 3 Phillips screws from the Dust Shield (E) the Drum Cleaning Blade (D).
- Remove Dust Shield (E) and Drum Cleaning Blade (D).
- Vacuum out the Cleaning Unit (C).
Assembly
- Lubricate new Drum Cleaning Blade (D) edge with fresh toner.
- Install new Drum Cleaning Blade (D) and Dust Shield (E) and reinstall 3 screws.
- Clean Charge Corona (F) and reinstall it against Left OPC Drum Unit Frame alignment pins. Note: the ground contact that connects to the drum cleaning blade bracket needs to be pushed down to fully reinstall the charge corona.
- Remove protective black wrap from new OPC Drum (G). Lubricate the OPC by applying a light dusting of fresh toner on the surface. Install new OPC Drum into Left OPC Drum Unit Frame (A). Install carefully; contact with the drum picker fingers can damage the drum coating.
- Reinstall Right OPC Drum Unit Frame (B) while aligning the frame pins with the charge corona (F), OPC drum (G), and Drum Shutter (H). Secure Right OPC Drum Unit Frame using 2 Phillips screws in lower holes.
- Manually rotate OPC Drum (G) to prevent Drum Cleaning Blade flip.
- Attach OPC Drum Unit to Developing Unit using (4) previously-removed silver screws. Install Imaging Unit in copier and turn on power.
|
- Publisher: Precision Roller